
Reference
Teaching the Basics of Call for Fire
Basic information to cover when teaching a class on call for fire (CFF).
This class will cover three types of fire missions: adjust fire (AF) missions, fire for effect (FFE) missions, and suppressive fire missions. Starting first with AF missions, we need to introduce the five rules of CFF.
Five Rules:
(1) Plot Yourself
Send POSREP to the Fire Direction Center (FDC).
Update POSREP every time you move.
(2) Get Direction to Target
Using lensatic compass, determine direction magnetic.
Convert direction magnetic to grid using declination diagram (apply +/- the GM Angle). This gives us our Observer-Target (OT) Direction, and is always expressed to the nearest 10 mils grid and transmitted with four digits.
Draw line from your current position through expected location of target.
(3) Estimate Distance to Target
Estimate distance to target along your observer target line (OTL).
Using key features, key terrain, known points, previous or recorded targets.
Utilize terrain association and known units of measurement (football fields).
(4) Calculate OT Factor
Divide distance by 1000, if less than 1.0, then round to nearest tenth (ex. 0.9); if over 1.0, then round to nearest whole number (ex. 2.2 becomes 2.0) and if it ends in 5, round to nearest whole even number (ex. 1.5 becomes 2.0, 2.5 becomes 2.0).
OT Factor is used for subsequent corrections IOT convert from mils (as spotted in the M22 binos) to meters on the deck, which we then pass to the FDC for corrections.
(5) Plot Target
Recorded and registered targets will be maintained on map for future use.
If you record a target upon completion of a RREMS statement, ask for a repot grid (which takes into accounts all adjustments and corrections made).
(*) Note the Mil Relation Formula — W = (R/1000)(M)
1 mil = 1 meter of later distance @ 1000 meters
R = Range in Meters
W = Lateral Distance in Meters
M = Angular Deviation in Mils

From the perspective of the FO, an angle of 1 mil (M = 1) separates points A and B.
At a range of 2,000 meters (R = 2000), then the lateral distance is 2 meters (W = 2).
W = (R/1000) (M)
W = (2000/1000) (1)
W = 2 Meters
From the perspective of an FO, an angle of 300 mils separates points A and B. At a range of 2,000 meters
W = (2,000/1,000) (300)
W = (2) (300)
W = 600 meters
Ex. 30 mils @ 3,000 meters = 90 meters; Ex. 30 mils @ 2,000 meters = 60 meters.
On Rounding
Must know rules:
OT direction is expressed to the nearest 10 meters.
OT distance is expressed to the nearest 100 meters.
“If it ends in 5, round to nearest even #.”
OT factor: if below 1.0, round to nearest tenth. If above 1.0, round to nearest whole number.
Ex: OT direction of 3215 —> expressed to nearest 10 meters —> ends in 5, round to nearest even —> 3220
Ex: OT distance of 1550 —> round to nearest 100 meters —> 1600
Ex: OT distance of 1700 —> OT factor of 1.7 —> round to nearest whole —> 2.0
Ex: OT distance of 1500 —> OT factor of 1.5 —> round to nearest whole —> 2.0 (ends in 5, nearest even)
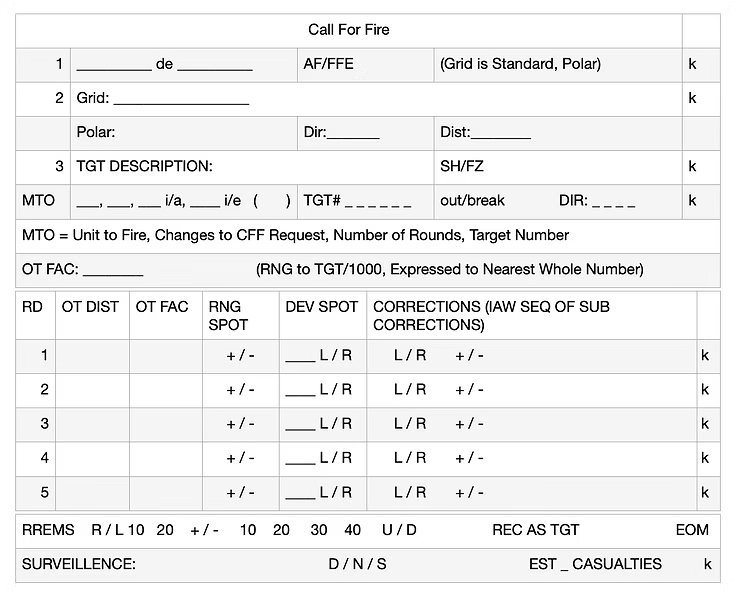
Standard Template:
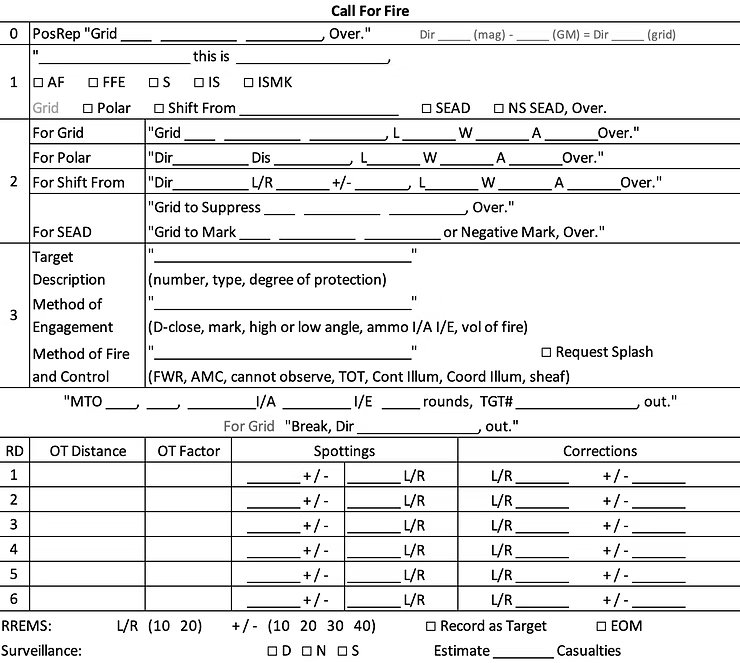
Alternative template, with length, width, altitude for linear targets:
Terminology:
SEAD = Suppression of enemy air defenses
NS SEAD = Non Standard suppression of enemy air defenses
Danger close = less than 600M
FWR = fire when ready
AMC = at my command
TOT = time on target
On Adjusting Fires & Successive Bracketing
Deviation Corrections Guide:
(1) First, determine the OT factor (use mil relation formula), dividing the distance by 1000.
(2) If greater than 1000, then express to nearest whole number; if less than 1000, then express to nearest tenth.
Multiply the deviation by the OT factor: if spotting is 45M to the right, at a distance of 4000 meters, then our OT Factor is 4. Therefore, we multiply 45 by 4 to get a deviation correction of L180.
If spotting if 45M to the left, and our distance is 700, then OT Factor is .7 — our deviation correction is 45 * .7 = R30.
Rule: deviation corrects are never less than L/R 30 meters!
Deviation corrections are always rounded to the nearest ten. 26 meters becomes 30.
Range Correction Guide:
Goal is to enter FFE as soon as possible, add/drops need to be aggressive to accomplish that.
We make corrections along the OTL.
Add (moves burst away from FO) vs. Drop (moves burst closer to FO).
(1) Range corrections are transmitted in multiples of 100, they smallest correction allowed is 100 meters, except for when entering FFE phase, when we can transmit a 50-meter correction.
(2) Know the four types of bracketing — hasty, one round adjustment, creeping fire, and successive bracketing.
(2A) Successive bracketing follows the range bracketing guide. To determine the initial range correction, follow the guide, and then from there each subsequent correction is split in half (ex: 400 —> 200 —> 100.
Range Bracketing Guide:
0 - 1000M. Correction: +/- 100.
1001 - 2000M. Correction: +/- 200.
2001M and up. Correction: +/- 400.
Example:

As demonstrated above:
First round was over, distance was at 2600 meters (OT factor 3.0), first correction was drop 400 (next correction should be half this).
Second round short, distance went from 2600 to 2200 (OT factor now 2), second correction is add 200.
Third shot over, distance went from 2200 to 2400 (OT factor still 2), third correction is drop 100.
Fourth shot short, distance went from 2400 to 2300 (OT factor still 2), fourth correction is add 50, FFE.
After the FFE stage, you analyze results: if additional rounds are needed on same location or different location:
Repeat — FO announces repeat for same volume of fire.
Adjust the Point of Impact — if FFE location needs to be moved, FO announces the appropriate corrections (known as refinements) and “repeat.” FO can also reenter adjust fire.
Ex: “R100, repeat, over.”
Ex: “Add 400, AF, over.”
Ending a Fire Mission:
Transmit at RREMS statement
Refinement - if fires were inaccurate but produced sufficient results, FO transmits the refinements in increments of 10 meters (and may be less than 30 meters for deviations).
Record as target - if FO wants target for future use, then record as target. FDC will apply the refinement, conduct a re-plot, and announce the adjusted grid to the target. Note: the target number will be the same target number that was provided in the MTO.
End of Mission - EOM followed by surveillance.
Surveillance - ex: “BMP neutralized, estimate six casualties, over.”
Ex of RREMS: “R20, add 20, record as target, EOM, three trucks destroyed, estimate 15 casualties, over.”
On Suppressive Fires
Suppressive fire missions take on two forms:
Delivered as an immediate suppression mission on (a) a planned target or (b) on a target of opportunity for a friendly unit under fire.
Delivered as a suppression mission on a planned target that is not currently active.
We must remember the purpose of suppression — to allow maneuver to do something. Since immediate suppression and suppression missions both yield suppressive results, these fires can allow:
Maneuver to close on the target;
Position the FO to AF on the target; or
Bypass the target all together.
(1) Immediate suppression missions normally require a minimum volume of fire. Unit SOP will establish:
The type of ammunition;
Units to fire; and
Volume.
For example: one mortar platoon, one round of HE/PD, one round of HE/VT.
This CFF transmission is sent in one transmission consisting of:
Observer ID;
WARN-O “immediate suppression”; and
Target location.
There is no MTO or RREMS.
Example:
FO: “This is W2P, immediate suppression, grid 221 432, over.”
FDC: “W2P, this is R2S, immediate suppression, grid 220 432, out.”
(2) Suppression missions normally consist of:
Observer ID;
WARN-O “suppress”;
Target number of planned target; and
Duration and rate of fire.
Example:
FO: “R2S, this is W2P, suppress AB3104, four minutes, four shells per minute, over.”
FDC: “W2P, this is R2S, suppress AB3104, four minutes, four shells per minute, out.”
On Bracketing:
As we just discussed, during AF mission you can use successive bracketing because it is “the only technique that mathematically guarantees you will have effects on target.” However, successive bracketing has its disadvantages. There are three alternate techniques for IDF: hasty bracketing, one round adjustments, and creeping fire.
(1) Hasty bracketing — due to the loss of surprise after firing the first round, successive bracketing (with multiple adjustments required) might result is decreased effectiveness. Therefore, an FO can use an initial bracket as a “yardstick” to determine the necessary correction and enter FFE phase faster. This depends upon:
Nature of the target;
Terrain;
Firing unit’s proficiency; and
FO’s experience.
(2) One round adjustments — you don’t need a bracket with this technique. Instead, the FO:
Spots the location of the first round;
Calculates and transmits a correction that is necessary to move the next burst onto target; and
FFE.
This technique can be used when:
Time has priority;
FO has a laser range finder;
Continued adjustments may endanger the FO.
(3) Creeping fire — this allows the FO to make range corrections by creeping the rounds closer to the target instead of bracketing or making large corrections.
In danger close situations. FO must keep in mind the position of friendly troops. Creeping fires would be applicable in situations where “lost rounds” are likely, ex: when the FO doesn’t have eyes on impact sight, when weather or terrain obscures FO’s LOS.
Ex: An FO wants to adjust rounds onto a target location on the topographic crest of a hill, so he chooses creeping corrections in 100M increments which move the rounds closer toward friendly forces until he sees them land on top the hill.
Notes:
Proper verbiage: “shot target #” from FDC is responded with “target # shot” from FO.
Difference between i/e and i/a — i/e is for the fire for effect phase, aka what we want to shoot during that. i/a is what we are shooting during the adjust phase, and we want rounds that are more safe for REDs during this.
If you want to change the shell fuse combo, it only makes sense to use HE/VT i/e, not i/a.
Get target number right the first time.
Deviation corrections left or right are never less than 30 meters.
Deviation corrections are always rounded to the nearest ten. 26 meters becomes 30.
Range corrections are never less than 100, once you hit 50, FFE.
For line three of the transmission, you can do the following: request splash, request max ordnance, request time of flight, and request at my command.
Danger close refers to any mortar or artillery round within 600M of friendly troops, or naval gunfire (127mm round) within 750M of friendly troops.
Sources:
https://www.trngcmd.marines.mil/Portals/207/Docs/TBS/B2C2497%20Call%20For%20Indirect%20Fire.pdf?ver=2015-05-07-105809-593